
Saturday, December 18, 2010
Friday, December 17, 2010
A Dandy Week

I must have done something right lately because Heather let me see two, that's two Dandy Warhol concerts this week. Then again, she might of resigned herself to the fact that I was going one way or another. They tour so little. Well, they tour as much as any band but that's just not enough for me. I check their blog regularly waiting for the slightest hint that a new album or a new tour will be announced. And then I pounce. You know that guy who waits in line a couple days before tickets go on sale? Well, I'm that guy when the Dandys release anything.

The top pic was taken at the Belly Up with the Hipstamatic app for the iPhone. The DEC 80 date is Hipstamatic's annoying inside joke for hipsters. "We've dated it 30 years before, cool, huh?" No, not cool. And there's no way to adjust the date - very not cool. Spencer joined me at the Belly Up and we had a good time talking family, work and surf. Bummer he doesn't live any closer to San Diego.
The second pic was taken at new Club Nokia near the Staples Center in Los Angeles. Another good venue, and as you can see, I scored a good spot near the stage again. Lee came along for the two hour show and the two hour drive home. LIvely conversation kept me from dozing off at 2:00 a.m.
I think that makes nine live Dandy shows I've seen. Maybe I'll go to their turf, Portland, for the tenth show.
Saturday, December 11, 2010
Here's A Smile

After reading the blog entry below I thought it prudent to show that indeed Juliet can smile for a photo. Just make sure the stars are aligned before you press the shutter button. And act quickly. She's easily distracted.
Friday, December 10, 2010
Someone's Had Enough

I love this photo. Heather dressed the kids in white, dragged them to Ocean Beach, and tried to take a Christmas photo. No easy feat. And don't forget, the kids have to spend an hour in the tub after each jaunt to the beach. So a quick beach photo can easily turn into hours of work. But Heather pressed on. With the sun fading fast she knew she only had a minute or two of good light left before this beach photo turned into a night photo that could have been taken anywhere. Christian and Erika performed like the pros they are but young Juliet just wasn't up to the task. Should've studied her biorhythm charts a little longer I suppose because this was clearly not the time for Juliet to shine. Well, by the time this photo was snapped Juliet had been fussing and uncooperative for a solid five minutes. After trying every trick in the book Heather tried bribery. She pulled a piece of candy from her shirt pocket. But bribery only works against a calculating and corrupt foe. Juliet is neither calculating or corrupt. She's a two year old and when she wants it, she wants it now. She leapt from her sandy seat and made way to the candy. Snap! By the looks of it, Christian and Erika decided to check-out rather than add to the turmoil. Heather came back home, bathed the kids, and pieced together a montage of our smiling kids walking through the sand for our Christmas card. I only wish this picture would have been on the reverse side.
Sunday, November 21, 2010
Process Or Results
 I love plastic film cameras. To most people Holga, Lomo, Smena and Diana sound like waiters at a Prague cafe. To me they're the Plastic Fantastic Four. Working with these cameras is about the same as talking to a Prague waiter too. They're tempermental, slow, unreliable and occasionally, just occasionally, bring good results. I'll take a month to shoot a roll of film, wait for it to be processed, pay real money to develop the negatives (when was the last time you did that?), only to realize that 33 out of 36 shots were overexposed. Frustating? Yep. And lest ye forget, these cheap plastic cameras don't come with cheap prices. Oh no. I pay premium European prices for these toys.
Then along came Hipstamatic. For a mere 99 cents I uploaded this app onto my iPhone. For a little more I added different electronic "lenses" and "films." Suddenly, my iPhone is like a dozen toy cameras all rolled into one. No need to rely on plastic lenses, the distortion is built into the programming. The prints come out already scratched and blurry. I love using Hipstamatic in a pinch. The results are to my liking. But they're so much less satisfying than the pics from my plastic cameras.
When it comes to hobbies, I'm a process guy more than a results guy. Examples? - I build my own furniture when I can buy a better product at Ikea for less money. I'm more interested in how movies are made than how entertaining they are. I tinker with the finest magician's apparatus (you call them "tricks") but I don't perform them well.
Sometimes I fool myself into thinking that the right camera, the right tools, or the right equipment will make me happier but "Much of the beauty that arises in art comes from the struggle an artist wages with his limited medium" - Henri Mattisse. For me, it's not the results, it's the attempt. I've also realized that Mattisse's words "limited medium" apply equally to my tools and to my imagination but I still plug along. Luckily, I have a wife who is not bothered by my distractions. She pats me on the head and says, "That's nice."
If you put a thousand Doug Nelson's with a thousand plastic cameras in a room, then maybe, just maybe one truly beautiful picture might arise. I'll let you know when that happens.
PS - The top pic was taken with a Diana Mini, 400 speed Kodak color film, punched-up a little using Picasa. I shot it two months ago and developed it last week. The bottom pic was taken the same day as the top pic using the Hipstamatic app. It "arrived" instantly.
Saturday, November 6, 2010
I Promise

I promise this is my last Halloween post. I have more pictures of Halloween than were ever taken of the Grand Canyon. Here's a select few from my church's Trunk of Treat.
 Never heard of a Trunk or Treat? Me neither until a few years ago. Each Halloween the local church throws a Chili Cook Off followed by a Trunk or Treat. Individually the chilis are delicious, but combined they can kill a horse. So go easy on the chili or they'll end up on the front of your costume. And the winner this year was . . . I dunno. I ate so much cornbread it clogged my ears.
 After the cookoff, the kids hobble to the parking lot in their costumes. The parents decorate their vans, trucks and cars with spiderwebs, pumpkins, and ectoplasm. Some have games, some have spooky music, but the best experience was a Ford pickup with two long card board boxes connected at the end inside the bed of the truck. The kids crawled down the cardboard tube, and then back again. That was it. And they loved it.
These pics were taken by Russ Fill. Don't recognize his name? Well, I guarantee you've seen his camera work on dozens of shows, from Oprah Winfrey to Survivor. I thought it would be nice to make a photo booth where parents could snap pics of their kids' costumes. Fresh from a shoot in, I dunno, Antartica or somewhere Russ took it to the next level by providing a backdrop, a camera, lighting, and a little expertise - all for free.
 Heather cut out the background lettering with her Cricut. Yeah, we have a Cricut. Jealous? It was a gift from my legal secretary. This was our first attempt at making lettering. "Its maaahvelous" says Heather.
Sunday, October 31, 2010
Halloween Night

Three straight nights of school, church, and Halloween dress-up. I'm done.

The strangest thing about Halloween this year was the kids nonchalant attitude about receiving candy. As a child I started trick or treating just before sunset and only stopped when the neighbors said "Shouldn't you be home by now?" My goal was to fill a pillow case with as many Smartees and Necco Wafers as possible. Then I'd pour the candy on the carpet and sort it, organize it, deliberate, and answer the most important question - "In what order shall I eat my precious treats?" After two days my mountain of candy was reduced to Brach's Neapolatins and butterscotch hard candies. Blech. But they were still candy so I felt forced by nature to eat them.
 Now the kids are given top shelf candy, I mean the good stuff like Almond Joys, Milky Ways and Baby Ruths. We have neighbors who hand out full size Snickers and party size bags of peanut M&Ms. And our kids have the gall to come home after a night of trick or treating and say "Eh, that can wait until tomorrow." The one bonus is that the kids are so blase about candy Heather and I can sneak one or two, or twelve and they don't even notice.
PostScript - this was Erika's first choice.
Haute Couture, Lego Style

Just prior to completing Christian's minifig costume, I expressed concern that he would quickly tire of its restrictiveness. Within 24 hours, Heather hand-sewed a soft version of the Lego Hoth Rebel Trooper shirt. I particularly like the ascot sown on the front which is a perfect real-world match to the Lego minifig version.

Here's Christian Halloween night ready to run from house to house. Lucky kid - two versions of the same costume? Really? Yeah, really. Don't feel too sorry for Erika and Juliet. They got the costumes they wanted. And November is Erika/Juliet month. Both celebrate birthdays in November and I have two heirloom type projects in mind that they can keep for the rest of their lives.
 One last note about Christian's costume - he won "Best Overall Costume" for the 2nd graders. Moments after this picture was snapped, they announced that he won. He was so happy he jumped up, lost his balance, turned a little to his right, began to fall, and knocked over five other kids like dominoes. The audience roared.
Thursday, October 28, 2010
Lego Star Wars Hoth Rebel Trooper
Lego Star Wars Hoth Rebel Trooper. Say that three times fast. Now try and build it for Halloween. Not so easy, is it? If you have to ask what a Hoth Rebel Trooper is then you're not my friend.

Christian and I had a blast building this costume. Okay, I mostly built it and he ran circles in the garage. Here's a pic of the real thing.

Not only do they look similar, Christian moves about as easy as the real minifig - you have to pick him up and place him where you want him.

It's hard to imagine a seven year old running around all Hallow's Eve in such a restrictive costume so Heather made a second matching soft version which goes underneath the foam version. Yeah, Heather's cool like that. I'll debut it tomorrow.

And compare that face to the minifig. The eyes, the smile - we tried to make a perfect replica but Christian is, hands down, more handsome than the original.

And the gun? Remember, you can see how I molded that from a silicon mold in black acrylic plastic here. http://nelsonsinspace.blogspot.com/2010/05/blog-post.html
Wednesday, October 27, 2010
Halloween Fast Approaching
Crunch time. Christian's costume is nearly complete. I offered to make Erika any costume she wanted and she said "Leopard." We already have a Leopard costume so instead of working until midnight on another elaborate costume I breathed an imperceptible sigh of relief. As for Juliet, well she's almost two and we have half a dozen costumes that will fit her. Care to guess what I'm making for Christian?

I found a child's motorcycle helmet for a couple dollars at a second hand store and applied some foam strips to it. The foam is easy to work with but its not easy to paint. I thought I would flood the foam with several coats of primer, sand it, and paint it, but it was a lot more work than I anticipated. Next time I'll use Apoxie Sculpt because its pliable, dries hard, and is easier to paint.


Here's a leg. You can see I turned the diamond plate pattern inward and used the smooth bottom of the flooring for the exterior. Straight cuts are easily made with a bandsaw. I also made a jig to hold a razor blade on a perfect 45 degree angle and cut the corners where the pieces joined. Gorilla brand instant glue worked best for joining the pieces. I later reinforced the corners with thing foam and a more glue. No resin on the exterior - I want it to remain flexible so he can walk.

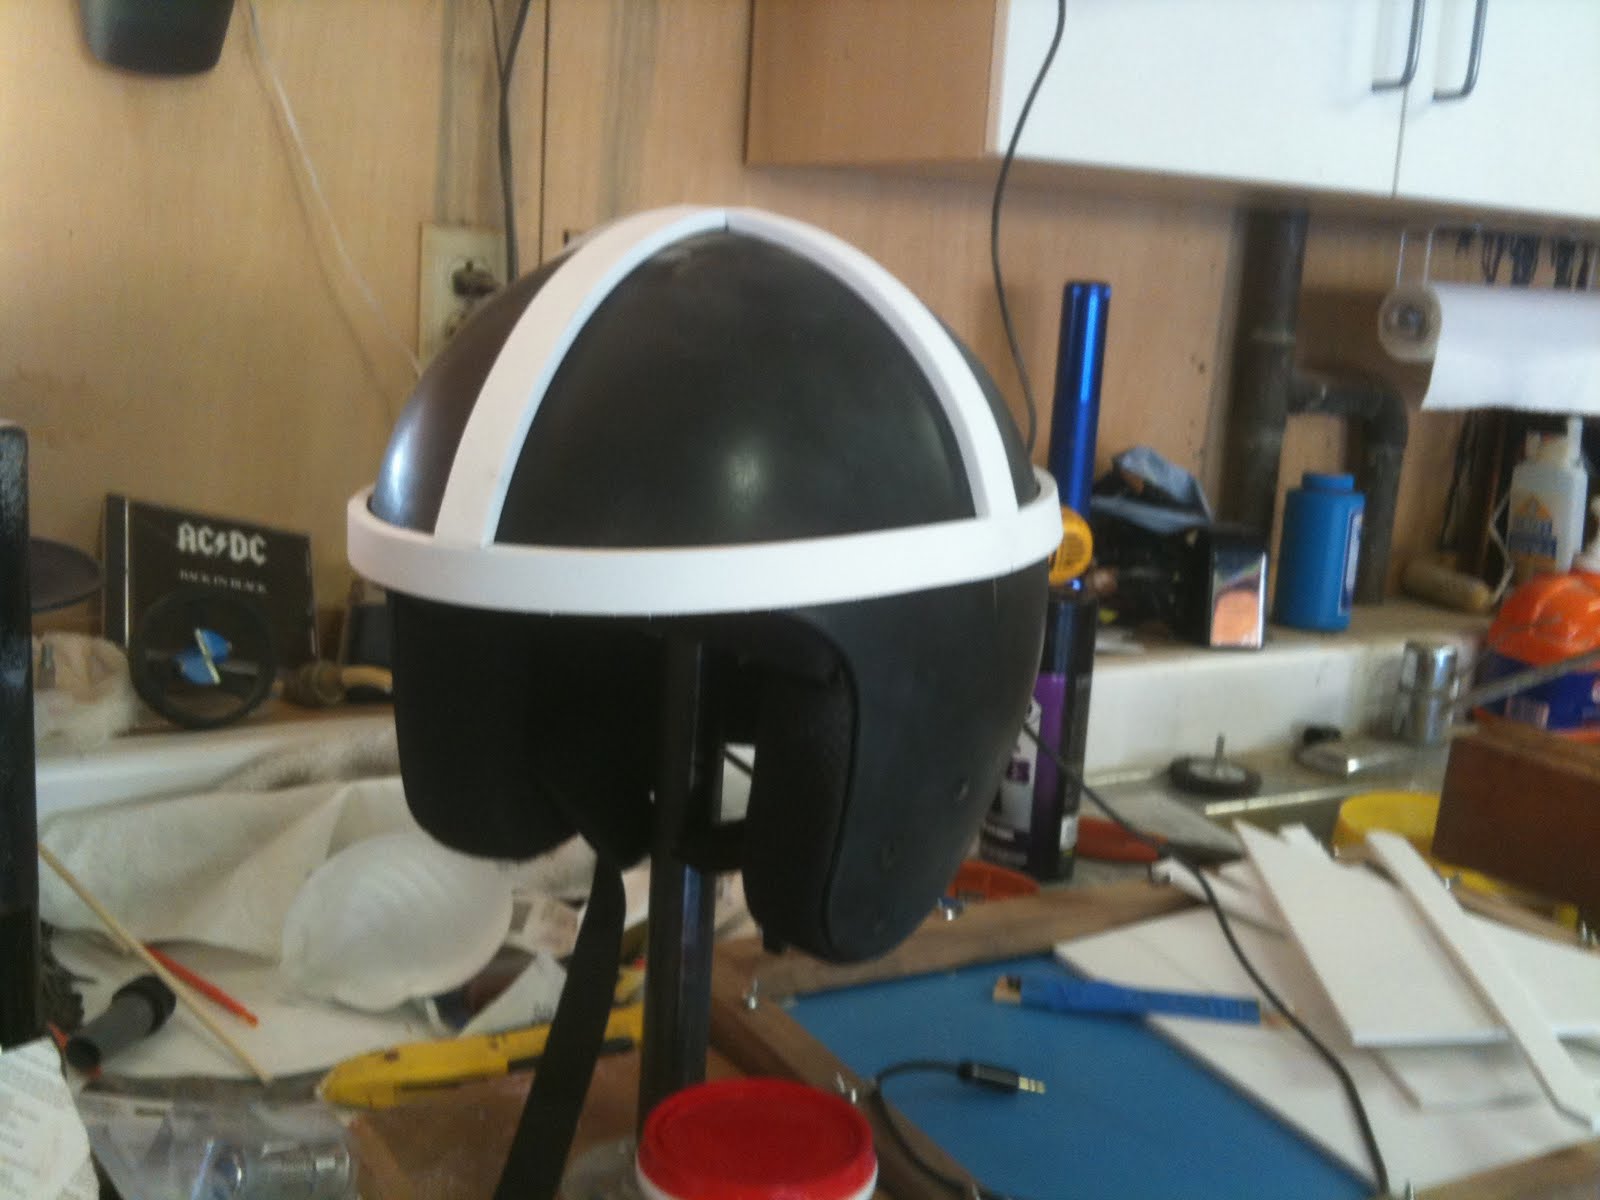
I found a child's motorcycle helmet for a couple dollars at a second hand store and applied some foam strips to it. The foam is easy to work with but its not easy to paint. I thought I would flood the foam with several coats of primer, sand it, and paint it, but it was a lot more work than I anticipated. Next time I'll use Apoxie Sculpt because its pliable, dries hard, and is easier to paint.

The backpack is made from foam flooring I purchased from Costco. I hardened the backpack by applying some fiberglass resin because I expect Christian will play with it long after Halloween. Another lesson learned? - I thought the resin would be enough but next time I'll throw a little fiberglass cloth in to strengthen it.

Here's a leg. You can see I turned the diamond plate pattern inward and used the smooth bottom of the flooring for the exterior. Straight cuts are easily made with a bandsaw. I also made a jig to hold a razor blade on a perfect 45 degree angle and cut the corners where the pieces joined. Gorilla brand instant glue worked best for joining the pieces. I later reinforced the corners with thing foam and a more glue. No resin on the exterior - I want it to remain flexible so he can walk.

First coat of primer. I brushed on primer to the boxy peices because I really wanted it to soak in. The backpack and helmet were sprayed. Stay tuned for the reveal!
Sunday, October 10, 2010
It's Almost Too Easy

Decorating for Halloween is almost too easy. I could cover every wall, ceiling and floor with the ideas that haunt my head every October. When I was in the second grade I was blessed to live in LaVerne. Not just any house in LaVerne. I lived in the house where the bookmobile parked each week during summertime. I remember walking out our front door, across the crab grass, sun cooking the top of my head, and then suddenly stepping up the stairs of the dark, air-conditioned mobile library.

I rotated through the same books week after week - Movie Monsters, The Legend of Loch Ness, and Dunninger's Encyclopedia of Magic. Few seven-year-olds knew as much as I did about Lon Chaney, Nessie, and Harry Blackstone, Sr. Consequently, my mind now gravitates to all things Halloween especially classic horror figures, urban legends, and mystery. I could easily spend more money on Halloween than Christmas but that would be lame.

So Heather and I edit our natural inclinations to surround ourselves in all things Halloween by following one rule - make it instead of buy it. This naturally limits our decorative ambitions because after working and raising three kids, there is so little time left to devote to Halloween projects (exactly 7 1/2 minutes a day). I spent a few hours working on the Skull display below. Here are three new projects made by Heather. I love her simple mod of our rabbit portraits - the Zorro masks; the bat sewed from a sock; and her delicious spiderweb cupcakes.
Sunday, October 3, 2010
Skull-y

I saw these little skulls at a Halloween store and bought a bag of them. I didn't know what I was going to do with them. I just knew I'd put them to use somehow.
 I thought of stringing them or make a ball out of them, but they'd go unnoticed in those forms. A shadowbox would work best.
I wish I had a few weeknights to work on this but I only had couple hours this morning.

After gluing up the pins, I placed one skull dead center in the shadow box and thought "Argh, one head looks better than the whole bunch."

I had already committed to my arrangement so instead of creating high-art I settled on a nice Halloween arrangement.
Monday, September 6, 2010
Niederfrank's

Niederfrank's. The name alone makes you want to try this ice cream.

Mint and chip.
Peppermint.

Chocolate.
I shot these with my iPhone using the Hipstamatic app. Nice app for 99 cents. Note the date - SEP 80. Hipstamatic thought is would be cool to time stamp their pics 30 years ago. Clever and stupid at the same time. Much to my chagrin there's no way to go into the settings and make the date current. I've researched the issue online and apparently I'm not the only Hipstamatic user who is annoyed by the 30 year old date.
Sunday, September 5, 2010
LIfe Size Lego Star Wars Blaster
As some of you may know, I used to work for a prop shop manufacturing magic tricks/illusions for some big time magicians like Doug Henning and Siegfried & Roy. Granted, my main job was to sweep the floor but the boss, Les Smith, soon realized that I had some mechanical skills instilled by my father. My father, the dentist, never shied-away from tackling a difficult project from repairing teeth to customing the interior/exterior of the family van to rebuilding the engine of an MG Midget. Everyday after sweeping the floor I was put to work building props - sawing, soldering, grinding, polishing, and sewing - anything to complete the prop. Well, I've always been fascinated by one prop building technique that I never learned - molding and casting plastic resin.

Inspired by Harrison Krix, an amateur prop builder at http://www.volpinprops.blogspot.com/, I decided to try a relatively easy mold/cast job - a life size Lego Star Wars Blaster. Anyone with a boy under 10 knows how popular this item could be. After scouring the Internet I found that no one had attempted a life size version of the ubiquitous blaster. So why not me?

This was also an excellent project to turn on my new Jet mini lathe. I chose soft, finely grained basswood because it's easy to shape but in the future I might choose maple because basswood tears out whereas maple is easier to machine.

My template was simple - a blown up picture of an actual Lego blaster. I glued up the shaped pieces, applied some car body filler, and sanded the piece over and over.

Using alternating colors of primer I was able to sand, pinpoint any flaws, then fill and sand them out.

I wet-sanded the final black coat of primer to 1000 grit. Then I waxed the master with car wax. Heather was surprised by the smoothness of the master's exterior. It felt like plastic but it was just wood, filler, and paint. Next time I mold an item I'll take the grit even higher because the silicon picked up every minor scratch of the 1000 grit sand paper.

I built a simple mold box, filled it with clay, and embedded the master half way. The dots you see are simply registration keys so that the two halfs of the mold would mate well together.

I filled the mold with Mold Max silicone, nice and slow in the beginning to make certain that no bubbles formed on the surface which might come through in the casting. Then I filled the rest of the mold with more silicon.

After the silicone dried, I flipped the mold over and removed the clay. Leaving the master in the mold, I applied a "release agent" (a must) and then poured the second half of the mold with silicone. After the second half dried, I peeled the mold apart and took out the master. Using white plastic I "slush cast" the first copy. The white resin set up in about 10 minutes.

I bought some black resin which sets up very quickly and molded a black version. The black resin has a shorter "open time" and heats up quickly. My first black copies came out warped. Apparently, the heat initially expands the mold and, as it cools, it sucks the sides of the gun inward. I solved the problem by demolding the copies just after they hardened (still warm to the touch) and drilling a tiny air hole to allow the hot air to escape as it cooled. The pink copy is simply white resin with a little red dye.

Above is a pic of an original Star Wars Mini Fig (Clone Trooper) holding a blaster - tiny, huh? My life size copies usually come out with a little flashing attached. I trim it off with a razor blade and polish the plastic with an electric buffer and jewelry buffing compounds. Voila!
Tuesday, August 31, 2010
Tuesday, August 24, 2010
Papercraft
Spent Monday night conducting a little Family Home Evening. This week's project? A little papercraft from Monkey Design. Fun project but a little too much for my young kids. I sat around the table and tried to keep them involved. The cutting, bending and gluing was just beyond their dexterity. I wanted to use Superglue because it dries to quickly but I feared the kids would stick their fingers together. So we used Elmers and a little tape to keep them together while they dried. I'll have to break some more of these out in a couple years when they're old enough to assemble them by themselves. Check out the designer's website for another 100 or so projects.


Subscribe to:
Posts (Atom)
